


How to Make a Car Seat Poncho: Easy Step-by-Step Guide

Are you tired of wrestling with bulky winter coats and car seat straps? You’re not alone.
Many parents face the daily struggle of keeping their little ones warm and safe during chilly car rides. Enter the car seat poncho—a clever, cozy solution that could save you time, stress, and keep your child snug as a bug.
Imagine the ease of slipping a warm poncho over your child, knowing it won’t interfere with seat belt safety. In this guide, you’ll discover how to make a car seat poncho that’s both functional and fashionable, ensuring your child stays comfortable and secure. Ready to transform your car rides? Keep reading to find out how!
Materials And Tools
Creating a car seat poncho requires thoughtful selection of materials and tools. Choosing the right fabric and having the right tools is crucial. It ensures a cozy and practical poncho for kids. This section guides you through the essential elements you need.
Fabric Choices
Fabric is the heart of your poncho. Fleece is a popular choice. It’s warm and easy to handle. Cotton is another option. It’s breathable and soft for comfort. Opt for vibrant colors. They appeal to children and add fun to the poncho. Consider fabric patterns too. They make the poncho visually appealing.
Essential Tools
Having the right tools makes the process smooth. Scissors are vital for cutting fabric. Ensure they are sharp for clean cuts. A sewing machine speeds up the sewing process. It ensures sturdy seams. Measuring tape is essential for accuracy. Pins help hold the fabric in place. A fabric marker is useful for marking cutting lines.
Credit: fabricartdiy.com
Preparing The Fabric
Start by selecting a durable and soft fabric suitable for a car seat poncho. Measure and cut the fabric to fit comfortably over the car seat, ensuring it provides warmth and ease of movement. Consider vibrant colors or fun patterns to make the poncho visually appealing.
Preparing the fabric is a crucial step in making a car seat poncho. The right fabric ensures comfort and warmth. Start by selecting a soft, durable material. Fleece is a popular choice for its warmth and ease of maintenance. Once you’ve chosen your fabric, it’s time to prepare it.
Measuring And Cutting
Accurate measurements are key. First, measure the child’s shoulder width. Add a few extra inches for comfort. Measure from the neck down to where you want the poncho to end. This will determine the length. Use these measurements to cut the fabric. Ensure straight edges by using a ruler or yardstick.
Creating The Pattern
Creating a pattern helps guide your cuts. Lay the fabric flat on a large surface. Fold it in half. This creates a symmetrical design. Mark the center point for the neck opening. Draw a semi-circle around this point. Cut along the semi-circle line. This will form the neck opening. Check the size by draping it over the child’s shoulders. Adjust if necessary.
Sewing The Poncho
Creating a car seat poncho is a fun and practical project. Once you have your fabric ready, the next step is sewing the poncho. This part of the process involves assembling the pieces and adding the hood. Each step is simple and requires basic sewing skills. Follow these steps to ensure a snug and cozy fit for your child.
Assembling The Pieces
Start by laying the fabric on a flat surface. Align the two pieces of fabric, ensuring the right sides face each other. Pin the edges to keep them steady. Sew around the edges, leaving an opening for the neck. Use a straight stitch for durability. Trim any excess fabric along the seams. This will help the poncho lay flat.
Adding The Hood
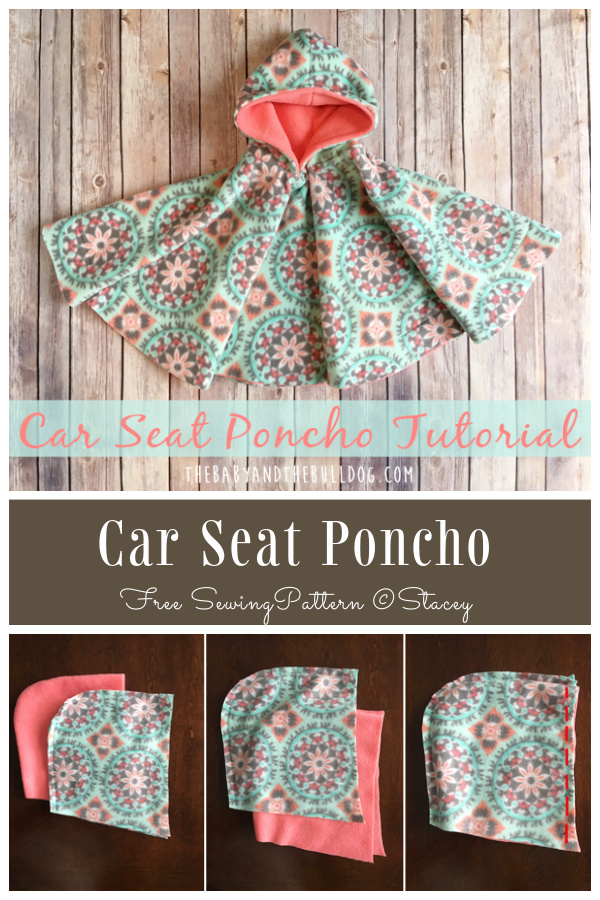
Cut two hood pieces from your fabric. Place them right sides together and pin along the curved edge. Sew along the pinned edge, creating the hood’s shape. Attach the hood to the neck opening of the poncho. Pin it securely and sew around the neck opening. Ensure the hood is evenly attached for comfort and style.
Finishing Touches
The final steps in making a car seat poncho involve adding the finishing touches. These details ensure the poncho not only looks great but also functions well. Pay attention to hemming the edges and adding fasteners. These tasks add both style and practicality to your creation.
Hemming The Edges
Start by folding the edges of the poncho. This prevents fraying and gives a neat look. Use a sewing machine for clean lines. Choose a thread color that matches or contrasts with the fabric. Carefully sew along the folded edge. Keep stitches even and tight for durability.
Consider double hemming for extra strength. This technique adds a professional finish. A well-hemmed edge enhances the overall design. It also ensures the poncho lasts longer, even with regular use.
Adding Fasteners
Fasteners make the poncho easy to put on and take off. Velcro strips are a popular choice. They are simple to sew and adjust. Position them strategically around the neck and chest area. This ensures the poncho stays secure during travel.
Buttons and snaps are alternative options. They add a decorative touch. Choose fasteners that complement the fabric pattern. Ensure they are easy for kids to use. Test the fasteners to make sure they hold securely.
Adding fasteners completes the poncho’s functionality. They keep the poncho snug and comfortable. A well-finished poncho is both stylish and practical.
Safety Considerations
Creating a car seat poncho is a fun project. But safety is key. A poorly designed poncho can pose risks. It’s important to ensure it fits properly. Comfort is also crucial. Let’s explore these safety considerations.
Ensuring Proper Fit
A poncho that fits well is safe. It should cover the child but not be too long. Avoid excess fabric. It can get caught or tangled. Measure your child before starting. Check the fit regularly. Children grow fast.
Testing For Comfort
A comfortable poncho makes car rides pleasant. Ensure the poncho is not too tight. Children should move their arms freely. The fabric should be soft. Scratchy material can irritate the skin. Let your child try it on. Adjust as needed for their comfort.
Customizing Your Poncho
Crafting a car seat poncho is simple and fun. Choose soft, warm fabric and cut it to your desired size. Add a hood for extra coziness, and finish with neat edges for a stylish touch.
Customizing your car seat poncho lets you express your style. You can create a unique piece that stands out. Adding personal touches makes it special. This section will guide you through the process.
Decorative Elements
Decorative elements make your poncho eye-catching. Choose colorful fabrics for a vibrant look. Patterns like stripes or polka dots add flair. Use fringes or tassels for a playful touch. Sew buttons or patches for added texture. Ribbons can create a sweet finish. You can mix and match elements for a balanced design. Consider using lace for a delicate touch. Embroidery adds a handmade feel. These elements transform a simple poncho into a fashion statement.
Personalization Tips
Personalization makes your poncho truly yours. Start by choosing colors that match your personality. Add initials or a name for a personal touch. Use fabric paints to create custom designs. Iron-on transfers can display favorite characters. Incorporate symbols that hold meaning for you. Personalize with quotes or phrases you love. Use stencils for easy application. Experiment with different shapes and sizes. Personal touches make your poncho unique. They reflect your individuality and creativity.

Credit: realitydaydream.com
Frequently Asked Questions
What Materials Do I Need For A Car Seat Poncho?
To make a car seat poncho, you’ll need fleece fabric, scissors, and a sewing machine. You’ll also need a pattern or template, thread, and Velcro for closures. Fleece is recommended for its warmth and comfort, making it perfect for keeping your child cozy.
How Do I Measure For A Car Seat Poncho?
First, measure your child’s shoulder width and length from shoulders to knees. These measurements help determine the poncho’s size. Ensure the poncho is long enough to cover your child while seated. A properly sized poncho ensures comfort and safety during car rides.
Can A Car Seat Poncho Replace A Winter Coat?
Yes, a car seat poncho can replace a winter coat while in the car. It provides warmth without compromising safety. Unlike bulky coats, ponchos allow car seat straps to fit snugly against the child. This ensures that your child remains secure in their car seat.
How Do I Ensure The Poncho Is Safe For Car Seats?
To ensure safety, the poncho should be worn over the car seat straps. This allows the harness to fit snugly against your child. Avoid placing the poncho between the child and the car seat. Proper use of the poncho maintains both warmth and safety for your child.
Conclusion
Creating a car seat poncho is simple and practical. It keeps your child warm and safe. The step-by-step guide makes it easy to follow. No need for special skills or tools. Just gather your materials and start sewing. This project is a great way to save money.
Plus, you get a custom poncho that fits perfectly. Enjoy the process and the result. Your child will love their new poncho. It’s a fun project for parents who love crafting. Stay cozy and safe on every car ride. Happy sewing!


