


How to Upholster a Car Seat: Expert Tips Revealed

Are you tired of the worn-out look of your car seats? Want to give your vehicle a fresh, stylish makeover without breaking the bank?
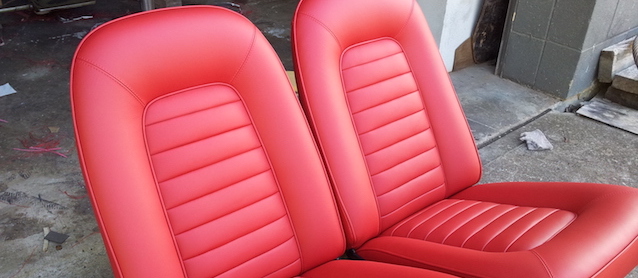
Learning how to upholster a car seat could be your ticket to a more comfortable and aesthetically pleasing ride. Imagine cruising down the road, enveloped in the plush comfort of seats that reflect your personal taste and style. This guide will walk you through the steps to transform your car interior from drab to fab.
Don’t worry if you’re not a pro; with the right tools and a bit of patience, you can achieve stunning results. Stick with us to discover the secrets of car seat upholstery that even beginners can master.
Credit: www.thehogring.com
Choosing The Right Fabric
Selecting the perfect fabric is crucial for car seat upholstery. It ensures durability and comfort. Choose materials that resist stains and fading, and match your car’s interior style.
Choosing the right fabric for upholstering a car seat is crucial. It impacts both aesthetics and functionality. The fabric you choose should enhance comfort while being durable. Let’s explore what to consider when selecting the perfect material for your car seat upholstery.Consider Durability
Durability is key in fabric choice. Car seats endure regular wear and tear. Choose a fabric that withstands frequent use. Opt for materials known for resilience. Leather, vinyl, and heavy-duty polyester are great options. They resist stains and are easy to clean. Durable fabrics maintain their look longer.Select Color And Texture
Color and texture set the mood inside your car. Choose colors that complement your car’s interior. Light colors make the space feel airy. Dark colors add elegance and hide stains. Texture affects comfort and style. Smooth fabrics offer a sleek look. Textured fabrics add visual interest. Ensure the fabric feels good to touch.Budget-friendly Options
Cost matters when choosing fabric. Seek budget-friendly options without compromising quality. Synthetic fabrics provide affordability and durability. They mimic the look of pricier materials. Consider fabric blends that offer both style and savings. Research to find the best deals. Quality fabric doesn’t always mean high cost.Gathering Essential Tools
Embarking on a car seat upholstery project can be rewarding. First, gather the essential tools needed for the job. Using the right tools ensures a smooth process and a professional finish. Let’s dive into the basic tools, specialized equipment, and safety gear required.
Basic Tools
Start with a set of basic tools. A screwdriver set is crucial for removing screws. Pliers help with pulling staples or nails. A utility knife is handy for cutting fabric. Get a staple gun for securing the new fabric. Don’t forget measuring tape for precise cuts.
Specialized Equipment
Some tasks need specialized equipment. An air compressor can power a pneumatic staple gun. Use a sewing machine for sewing seams. Fabric scissors offer clean cuts on upholstery material. An adhesive spray ensures the fabric stays in place. Consider a heat gun for smoothing wrinkles.
Safety Gear
Safety is essential while working. Wear gloves to protect your hands. Safety goggles shield your eyes from debris. A dust mask prevents inhalation of fabric fibers. Ensure your workspace is well-ventilated. This prevents exposure to harmful fumes.
Preparing The Car Seat
Upholstering a car seat begins with proper preparation. This step is crucial. It sets the foundation for a successful transformation. Careful attention ensures a durable and professional finish. Before diving into the actual upholstery work, focus on the seat itself. This includes removing old materials, inspecting the frame, and cleaning. Each task plays a vital role. Ensuring a clean and sturdy base is key.
Removing The Old Upholstery
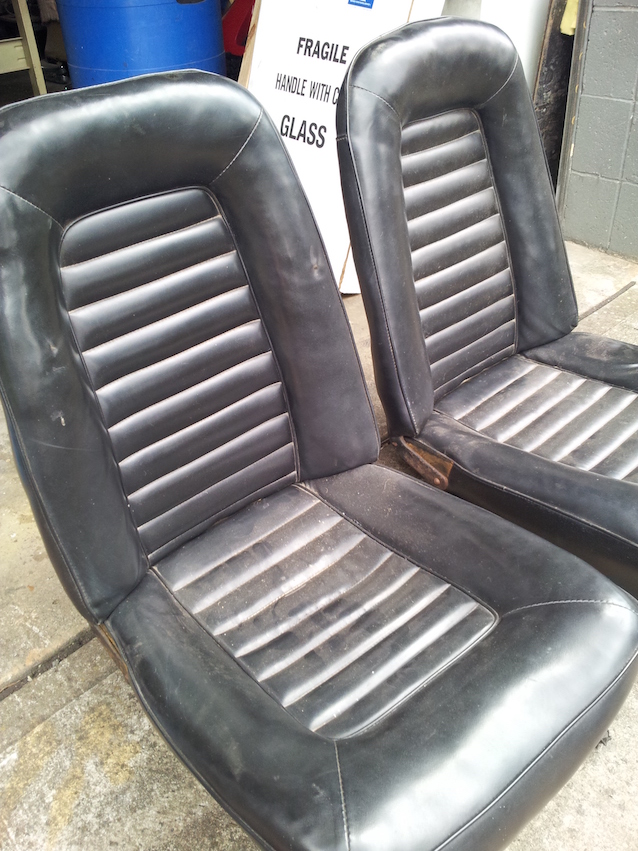
Start by taking off the current upholstery. This might require some tools. Screwdrivers and pliers can be helpful. Be gentle to avoid damaging the seat. Carefully detach the fabric or leather cover. Keep track of any clips or fasteners. Reuse them if they are in good condition. Removing the old material reveals the seat’s structure.
Inspecting The Seat Frame
Once the upholstery is off, inspect the seat frame. Look for any signs of wear. Rust or cracks can weaken the frame. Ensure that the seat is safe and reliable. If you find damage, consider repairing or replacing parts. A solid frame ensures a comfortable and safe seat.
Cleaning And Repairing
With the seat frame exposed, clean it thoroughly. Remove dirt and debris. This ensures the new upholstery adheres well. Use a vacuum and a damp cloth for best results. Address any minor repairs needed. Tighten loose screws or bolts. This attention to detail will pay off. A clean and repaired seat makes for a smooth upholstery process.
Cutting And Measuring Fabric
Start by laying out the fabric flat on a clean surface. Ensure accurate measurements with a tape measure to match the car seat dimensions. Carefully cut the fabric, leaving extra inches for tucking and securing. This precise approach ensures a snug fit for your car seat upholstery project.
Cutting and measuring fabric are crucial steps in upholstering a car seat. Accurate cuts ensure a snug fit, enhancing both comfort and aesthetics. Mistakes here can lead to wasted materials and frustration. This guide will help you measure and cut fabric with confidence.Taking Accurate Measurements
Accurate measurements are vital in upholstery. Use a measuring tape for precision. Measure the length and width of each section of the seat. Note measurements twice to ensure accuracy. This prevents errors in fabric cutting. Keep a notepad handy to record each dimension clearly.Using Patterns
Patterns guide you in cutting the fabric correctly. Create a pattern using old fabric pieces. Lay them flat on the new fabric as a template. Ensure the pattern aligns with the fabric grain. This maintains the fabric’s strength and appearance. Using patterns saves time and reduces errors.Avoiding Common Mistakes
Avoid stretching the fabric while measuring. This can lead to inaccurate cuts. Double-check your measurements before cutting. Mistakes are costly and time-consuming. Choose a sharp pair of fabric scissors. Dull blades can fray the fabric edges. Always cut slowly and steadily for clean lines.Sewing Techniques
Sewing techniques form the backbone of car seat upholstery. Learning these techniques can transform a simple fabric into a stylish cover. Whether you are a beginner or skilled, mastering sewing techniques is crucial.
Basic Stitching
Start with the straight stitch. It’s simple and strong for car seats. Use it for seams and hems. Practice makes perfect. Try the backstitch for extra strength. Ideal for areas with more stress. Hand stitching gives you control. It’s slower but precise.
Advanced Techniques
Explore decorative stitches. They add flair to your car seat. French knots and chain stitches create unique designs. Combine stitches for complex patterns. Learn to use piping and welting. These techniques add texture and detail. They enhance the appearance of your upholstery.
Using A Sewing Machine
A sewing machine speeds up the process. Choose one with upholstery settings. Machines offer consistent stitching. Adjust tension for different fabrics. Practice on scraps first. Use the zigzag stitch for flexibility. It’s great for stretchy materials. Follow instructions carefully. Safety is important.
Credit: www.thehogring.com
Attaching The New Upholstery
Attaching new upholstery to your car seat is a crucial step. It’s where the transformation truly begins. The process involves aligning, securing, and adjusting the fabric. Each step ensures a snug fit and a polished look. Follow these steps carefully for a seamless finish.
Aligning The Fabric
Begin by placing the new fabric over the seat. Ensure it covers the entire area evenly. Check that the pattern or texture matches your style. Smooth out any wrinkles or folds. Use your hands to gently stretch the fabric. A perfect alignment sets the foundation for the next steps.
Securing With Fasteners
Once aligned, fasten the fabric to the seat frame. Use appropriate fasteners like clips, staples, or screws. Start from one side and move to the other. Ensure each fastener holds the fabric tightly. Double-check each connection for security. Proper fastening prevents future shifts or loosening.
Final Adjustments
After securing, make final adjustments to the fabric. Inspect every corner and edge. Tweak any areas needing extra attention. Pull gently to remove any remaining slack. Smooth out surfaces for a neat appearance. Ensure the fabric feels comfortable and looks flawless.
Finishing Touches
In the final stages of upholstering a car seat, attention to detail is crucial. This phase involves adding personal flair and ensuring the seat is comfortable. Each element contributes to the overall look and feel of the car interior. It’s where the seat transforms from a basic structure to a personalized piece of art.
Adding Decorative Elements
Decorative elements give your car seat its unique character. Choose materials that complement the car’s interior. You might consider stitching patterns or embroidery for a touch of elegance. Leather piping adds a sophisticated edge. The choice of color can make a big impact. Bold colors stand out, while neutral tones blend seamlessly.
Ensuring Comfort And Functionality
Comfort is key for a pleasant driving experience. Use high-quality foam padding to support long drives. Check the seat’s adjustability for optimal positioning. Make sure seat belts fit comfortably without obstruction. Functional aspects should never be overlooked. They ensure the seat works well for daily use.
Quality Inspection
Inspect every detail once the upholstery is complete. Look for loose threads or uneven seams. Ensure all decorative elements are securely attached. Test the seat’s comfort by sitting for a few minutes. Adjust anything that feels out of place. A thorough quality inspection guarantees your car seat looks and feels perfect.

Credit: www.youtube.com
Maintenance And Care Tips
Maintaining the look and feel of your car seat upholstery is essential. Proper care keeps seats fresh and extends their life. Here, we’ll explore tips for regular cleaning, preventing wear, and handling repairs.
Regular Cleaning
Dust and dirt can damage upholstery over time. Vacuum seats weekly to remove debris. Use a soft brush attachment for delicate fabrics. For deeper cleaning, use a mild fabric cleaner. Apply it gently with a microfiber cloth. Avoid harsh chemicals to prevent fading. Leather seats need special care. Use a leather cleaner and conditioner monthly. This maintains their softness and shine.
Preventing Wear And Tear
Seat covers protect against spills and stains. They also reduce direct sunlight exposure. Sun can fade colors and weaken fabric. Install window shades to block harmful UV rays. Rotate seat covers regularly to avoid uneven wear. Be mindful of sharp objects in pockets. They can scratch or tear upholstery.
Handling Repairs
Minor tears and punctures are repairable. Use upholstery repair kits for small fixes. Follow instructions carefully for best results. Larger damage may need professional help. Find a trusted upholsterer for complex repairs. Regular inspections help catch early signs of wear. Addressing issues promptly saves time and money.
Frequently Asked Questions
What Tools Are Needed For Upholstering A Car Seat?
To upholster a car seat, you’ll need a staple gun, scissors, upholstery fabric, and a sewing machine. Additionally, a flathead screwdriver, pliers, and foam padding are essential. Having a seam ripper can also be helpful for removing old fabric. These tools ensure a smooth and efficient upholstery process.
How Do I Choose The Right Fabric?
Choosing the right fabric involves considering durability, color, and texture. Opt for automotive-grade material for longevity. Ensure the fabric complements your car’s interior. Test the fabric’s stretch and comfort before purchasing. Consider stain-resistant and UV-protected options for added protection. This ensures a long-lasting and visually appealing upholstery job.
Can I Upholster A Car Seat Myself?
Yes, you can upholster a car seat yourself with patience and basic tools. Follow step-by-step guides or tutorials for assistance. Beginners may find it challenging, but it’s achievable with practice. Start with a simple design and gradually tackle more complex projects.
DIY upholstering saves money and allows customization.
How Long Does It Take To Upholster A Seat?
Upholstering a car seat typically takes 4 to 8 hours. The time varies based on your skill level and complexity. Beginners may take longer to ensure precision. Experienced upholsterers might complete the task faster. Allocate ample time to avoid rushing and ensure high-quality results.
Patience is key to achieving a professional finish.
Conclusion
Upholstering a car seat can be a rewarding task. It refreshes your vehicle’s look. Plus, it adds comfort for every ride. With practice, your skills improve. Start with basic tools and materials. Choose fabrics that suit your style. Follow the steps carefully.
Enjoy the process. Feel accomplished as you see the final result. It’s a great way to personalize your car. You save money by doing it yourself. And you gain a new skill. Dive in and give your car a stylish upgrade.
Your efforts pay off with a fresh, new interior.


